1. In the "New service" dialog box that appears, enter the details for your new service: Enter a Service Name, such as Office hours or Academic advising.
2. Add a brief description of the service. Make sure it’s clear how each service you
offer differs from others, so that visitors to your calendar know what to book.
3. Choose a default location. This is where people will be directed to go for their
appointment when you are meeting them in person. For online appointments, enter Teams Meeting.
4. Enable/disable Add online meeting. This will create a join link for a virtual meeting in Microsoft Teams in the booking
confirmation. Teams is the easiest way to use Bookings for virtual meetings, so we
recommend that you do so. If you prefer Zoom, leave this disabled and add your Zoom
location to the Location field. We recommended that you create a Zoom location for each service and limit
access during active appointments for privacy.
5. Choose a default duration for appointment.
6. If you enable the Buffer time your customers can’t book setting, you will be able to choose a duration either before or after your meeting
(or both) during which the staff member’s time can’t be booked.
Note: Buffer time gives you and your staff time to regroup between appointments and allows
some time for appointments that run long, so we recommend enabling buffer time as
a sanity saver.
7. Enable/disable Let the customer manage their booking. This allows the student or colleague booking the appointment to manage it themselves.
Note: if you disable this option, be sure to include a note in the confirmation email letting
people know that if they want to make changes, they will need to contact you or a
staff member to do so. Be aware that if you do allow students to manage their own
appointments, all calendar users will need to be vigilant about monitoring for last-minute
changes.
8. Set the Maximum number of attendees per event. For services like academic advisement that require privacy you can limit this to
one attendee. For exam review sessions or labs, you can raise this limit to whatever
maximum number you think can be reasonably managed at one time.
9. Leave Default price set to Price not set.
10. In Notes, include any information internal users might find useful about the scheduling policy,
the purpose of the service, privacy considerations, etc.
11. You can choose whether to display the following Custom fields on the booking page:
- Customer email
- Phone number
- Customer address
- Customer notes
If you display these fields, anyone making an appointment for the service will be
required to provide the indicated information. We recommend you select at least the
Customer email field, so that staff has a convenient way to reach people about their appointments.
12. Add text for automatic reminders about the appointment at the intervals you prefer.
We recommend including at least one reminder one day before the appointment. Be sure
to include a reference to the specific service the student booked. Add additional
information for the email confirmation. Using Teams for virtual appointments is most
convenient, and a link to the Teams location will be included in the email confirmation,
but if you are using a shared Zoom meeting space for your appointments for this service,
you can add the information for accessing that space here, or just say “our staff
will contact you with Zoom location information prior to your appointment.”
Note: Remember to not include information for individual Zoom accounts if more than one
person can be booked for a service!
13. The person scheduling the appointment will receive an email that includes your
message, and a link to the Teams meeting location if you are using Teams.
14. Enable Show this service on the booking page. You only want to disable this if you are defining a service that is only offered
only periodically, such as an exam review session. This setting makes it convenient
to use the same service multiple times; all you need to do is adjust the available
times and re-enable this display setting for each exam review, for example.
15. You can use the default scheduling policy defined on the Bookings Page settings
or choose a policy that applies only to this service. Defining a scheduling policy
allows you to refine the parameters that restrict how services are booked.
- Time increments: the duration for each increment of time during the available time for a service;
in other words, if you are available for office hours from noon-3:00 p.m., setting
the time increment for 30 minutes will give you a set of 30-minute appointments.
- Minimum lead time: this will define the latest that someone can set or cancel an appointment for the
service. If you offer lab tutorial time, but need to make sure there is opportunity
for staff to set up a bench for the appointment, you might set this to sixty minutes
so no one can schedule something only a couple of minutes before they show up.
- Maximum lead time: if you only want to accept appointments for this service a certain period of time
in advance, set this field as necessary.
Notes:
- If you define a new scheduling policy, you will also be able to choose options for
sending email notifications or booking specific staff for just this service.
- You will also be able to set different availability for a service during a certain
date range, which is useful for blocking out times lab space is unavailable, for example.
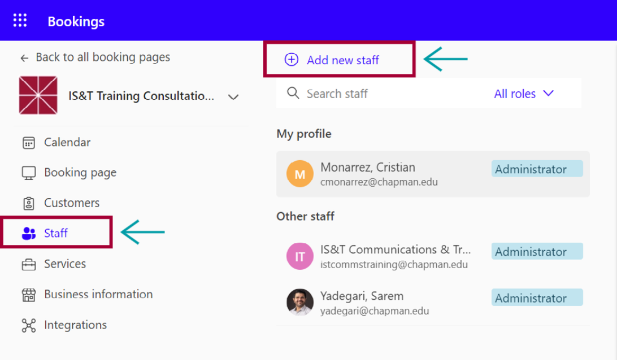
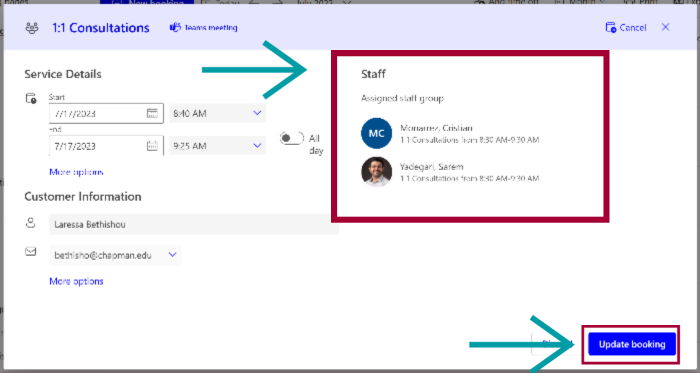
16. Assign staff to the service by clicking their name on the right. Selected staff
will be highlighted in gray and have a checkmark next to their name.
17. Click an assigned staff member to remove them from the service.
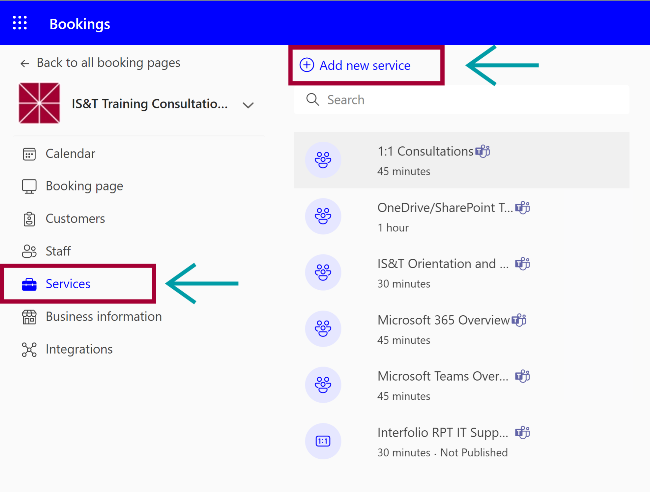
18. Click Save. Your defined services will all appear on the Services screen. Your bookings page
will also display them for people to select when setting appointments, as shown in
the screenshot below.